Pages

Thursday, 27 November 2014

DIY Christmas ornaments with kids


My son had to take a few Christmas decorations to school and this year we decided we were going to make them. We love crafting together and its a pleasure to see the twinkle in eyes as he holds up his finished piece. 
 
Crafting is good for your kids. What better way to get them off the idiot box and other attention devouring gadgets. Yes, it involves mess and clean up but its worth it.

We found some great ideas online.


1. Popsicle Stick Star from Ankle Biter Art
Kids can help paint the Popsicle sticks and put glue drops.


2. Popsicle Stick Snowman from momontimeout
This we made months ago so all we are going to do now, is fix a ribbon hoop and its good to go. Again, painting, sticking. 


3. The adorable Ribbon Christmas Tree ornament. This is so cute! Here he helped me thread the beads. 


Yes! Its beginning to look a lot like Christmas. Cannot wait to get the tree up and make some more stuff!


Tuesday, 25 November 2014

I won! I won! I won!


Yes I did!

Last month the Good Housekeeping (India) Magazine was celebrating their 10 anniversary edition and they had loads of contest and plenty goodies to be won. 

I noticed a 'Craft To Win' contest and I had to send something right?? Since I did not have enough time to whip up something new, I did send in 3 of my DIY projects.

1. Tissue flowers and Yarn lanterns
2. Ivory rose wreath
3. Backlit Canvas.

Anyways, my tissue flowers and yarn lanterns won me the prize. I should receive a big fat hamper by the end of December!


Yay!

DIY Decoupage Canvas Art

Here is a very simple decoupage project that anyone can try at home. 


All you need is:
1. A canvas
2. Pretty paper napkin or any decoupage paper.
3. White school Glue
4. A Foam brush

First cut out the picture you want to decoupage. Do not separate the sheets of your napkin before cutting. It becomes too flimsy and will tear. 

After deciding where the image should go, make very light markings on the canvas so you know where to apply glue.

You can use either a  foam brush or an artists brush to apply glue.

Separate the sheets of your paper napkin and then carefully place the picture and stick into position. Patioelf suggests using Serrano wrap to always smooth out wrinkles which I have tried earlier on other projects but not for this one.

I did end up getting a few wrinkles, but I felt it kind of added depth to this particular piece. 

After it dries, if you feel it has not adhered properly, add one more coat of glue.

Let it dry and then add a top coat. Where I live I don't have access to modge podge of any type. So my top coat was also school glue.

The sides of my canvas was 1 inch thick. And let the image spill over to the sides - again for some depth.

I loved how it turned out.. So even if you cannot paint like Van Gogh, don't worry you can always use decoupaged canvas art to pretty up your walls! 

Monday, 24 November 2014

Backlit Canvas


The primary inspiration was for this project was from curbly where Michele was inspired by  Valérie Boy's Féérie Florale. I fell in love with this concept of back lighting.

Mine does not reach anywhere near the master piece that is Féérie Florale. Nor can it be considered a knock off... But I wanted to try making something similar.


I first ran out to get a canvas, I was not bold enough to buy a large one, cos I was not very confident about how it was going to come out. Boy's work is on powder coated metal. She has to be true artist to cut flowers on that! Michele (curbly) stuck a piece of card stock on hers and cut the flowers on that. I loved how subtle hers look. I ended up cutting on the canvas it self. 

At first tried the same design of cascading flowers, but they did not seem to work very well for me, So I took some help by using big flowers from a piece of left over gorgeous wrapping paper.

1. A canvas
2. Left over wrapping paper
3. Glue
4. Penknife
5. Tracing paper
6. String lights
7. Some acrylic paint- I used a turquoise blue.

How I made mine:

First I cut out the flowers from the wrapping paper using a sharp penknife. And moved them over the canvas to see where I wanted the flowers to go. 


Using a cutting mat, I made partial cuts in the flowers around the petals and stamens and almost raised them up to give a kind of 3D effect. I wanted the light to shine through this. 

I stuck the flowers on to the canvas in a decoupage kind of way, taking care not to damage or glue the portions I had already slit. 

Now when I placed the string lights behind,I felt the amount of light coming through the canvas was too less, so I made a few cuts in the canvas. Since this was a last minute plan, it was a little tricky. I carefully made holes in the canvas under the petal and stamens that I slit and bigger holes in the leaves so that I could push the tiny bulbs through. 

The openings in the leaves turned out too big and the canvas started curling in at the edges, so I had to reinforce by gluing tracing paper on the back side. 

This is when I decided white was too Blah and it needed a pop. It was the first time in my life I was painting with acrylic and on a canvas. (ya unbelievable!) But I took the leap! And it came out fine. I had to be extra careful not to paint over the edges of the flowers. 


The Christmas lights that I had were longer that I wanted, but I decided to make to with that for the time being. 

If you examine it very closely, you will find many many flaws in the paint job and the over all finish. But I am super glad, I tried it out and I learnt a whole lot!


Christmas lights look great in any form and this is such a creative and beautiful way to liven up your space. 

If you think this is too complicated, here is something easier from apartmenttherapy

Light it up!

Saturday, 22 November 2014

DIY Decoupage - Little Pink Box


If there ever was a purpose for printed and especially ‘floral’ printed paper napkins it would be decoupage and nothing else. OK maybe to pretty up your tablescape for a photoshoot but for NOTHING ELSE. How on earth can anyone with even an ounce of sense ever wipe their face or mouth (that has gravy on it) with those gorgeous things and then crumple it and then throw it away? It would be a crime! 
Decoupage even sounds romantic. Just like anything French. Sigh…And its not even as difficult as Fine French cuisine. Easy and simple and your decoupaged product will still end up looking fine, French and lovely.

Here is my first attempt on a decoupage project. 

The paper napkin:


Here is the a little cardboard box I decoupaged. This is for my daughter to store her teeny- tiny hair clips. 


Most of the tips I picked up have been through YouTube videos from patioelf. She makes some mean stuff. Love her tips and techniques.

Can't wait to make some more stuff!!

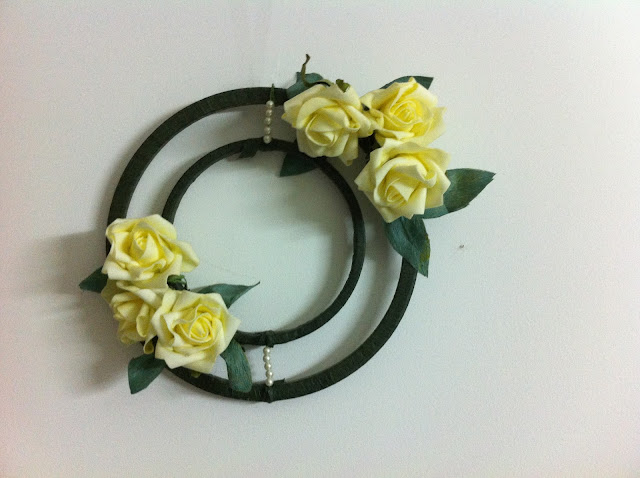
DIY Ivory Rose Wreath


A simple wreath made with embroidery rings hung concentrically. I love the placement of flowers at the 8:10 position.

Things you need:

1. 2 embroidery rings. I used 9 and 6 inch ones.
2. green floral tape
3. floral wire - green
4. roses or any other pretty flowers. Mine did not have leaves, so I ended up making my own crepe paper leaves.
5. Pearls
6. Ribbon/Fishing wire to hang the wreath.


How I made it:

1. I first covered the 2 rings in green floral tape.

2.The whole idea of placing the rings concentrically was only because each ring by itself was too skinny for my big roses. So I held them in place by stringing equal number of pearls on green floral wire and twisting them on to the rings. It did take some work and it helps if you have nimble fingers....

3. Once I was happy with the alignment. (and it took me quite a bit of time), I started securing my roses in the 8:10 position. To give it symmetry, I placed 3 roses on the outer ring and 3 on the inner covering the embroidery ring clasp and screw(which I also placed in the 8:10 position, btw). The ivory foam roses already had 6 inch long stems made out of floral wire. So the securing was easy.

4. To make the leaves, I glued two eye shaped pieces that I cut out from green crepe paper together after placing a green floral wire (stem) between them and secured them between the roses.

And Tada! There is my delicate looking Ivory Rose Wreath.

You can also lay it down flat on the table and place a votive candle in the middle to make it a pretty centre piece.

DIY Yarn Lantern

If you haven't tried making these lovely yarn lanterns yet, now is the time. Made with easy to grab supplies, some space where you can get messy and a wee bit of patience. You will love these beauties.


Jazz up your party décor by grouping it up with party balloons and large tissue flowers, or arrange them in different sizes to form a table centre piece. Or get handy with a light kit and illuminate your garden party in a nice soft way. The options are endless. And the satisfaction immense.
I ended up making a bunch of these for my niece's 1st birthday party. And it was a little challenging as I had to turn into a night owl, waiting for my little kids to get to bed and transform the home-office into a no-entry zone lined with trash bags, a temporary drying line using a curtain rod  balanced between 2 chairs and enough RedBull to give me wings! But I loved how they turned out. Here are a few pictures.

After checking various websites, I followed instructions from Ruffled.
For presentation, I had to borrow an idea I saw at a christening party where the lantern was placed  in a small basket and hung using fishing wire. It almost looked like a pretty hot air balloon if you will. :) 


To secure the yarn lantern to the basket I used fishing wire and basically threaded it through the balloon and the gaps in the basket.  

To hang, initially I strung the fishing wire to the top of the lantern only to realize that my lanterns where not super strong and so the shape was giving away. And since I was working on party decorations I could not afford poor shape. So I ended up stringing and securing the fishing wire to the base of the basket and up through the entire length of the balloon.

At the time I was too disorganized to document the process step by step (I still am :( ). But here are some pictures I did end up taking.

Prototype 1: Hung on a clothes line to dry (for 24 hours)


After the balloon was deflated.


Hanging on my makeshift drying line


How to:

  • Inflate balloon
  • Make glue mixture.  Half parts of school glue, half parts water and some cornstarch. Stir well. Not too watery and not too thick. Use bowl big enough to dip ball of yarn.
  • Dip ball of yarn in glue mixture.
  • Let it soak for a bit. Just to coat.
  • Meanwhile coat balloon in petroleum jelly
  • Hold balloon and start wrapping gluey yarn to it as firmly as you can in all directions.
  • Once satisfied with the coverage, tuck the end of the yarn into any corners securely.
  • Let it dry either on a drying line or on a cup.
  • Once dry, deflate the balloon, slowly
  • If there are too many glue crystals, try nipping it off with a chop stick or small knife taking care not to cause damage.


These would be the lessons I learnt:


1.       Do not underestimate the sticky mess that this project is. Ensure you have covered your floor with large plastic sheets. Wear a trash bag dress. Tie up your hair. J


2.      If you plan to do multiple balloons, have enough glue and yarn on hand. Inflate all you balloons prior to getting to the glue mixture. A big enough bowl for your mixture. And have the drying line ready. I simply used a curtain rod balancing on 2 dining chairs.


3.      It would also make sense to string all the balloons from the drying line so that while you are gluing the yarn to the balloons, you could take a break without having to set the balloon down.  You don’t want to try and string sticky gooey balloons. Trust me it was a mess.


4.      It has to dry for at least 24 hours or more. In my case, the balloons I had started deflating before the end of 24 hours which was quite discouraging as it caused shriveling at the base of the lantern. Some videos on YouTube suggested inflating a new balloon into the yarn lantern to plump it up. That is what I did. It was a little tricky but it worked.
5. Do not pop the balloon. Make a tiny prick near the knot and let it deflate slowly.